<![CDATA[/* steve jansen */]]>2015-08-26T09:28:23-04:00http://steve-jansen.github.io/Octopress<![CDATA[Parsing Jenkins secrets in a shell script]]>2014-12-16T14:39:54-05:00http://steve-jansen.github.io/blog/2014/12/16/parsing-jenkins-secrets-in-a-shell-scriptThe Jenkins credentials-binding plugin
provides a convenient way to securely store secrets like usernames/passwords in
Jenkins. You can even inject these secrets into build steps as environmental
variables in a job like this:
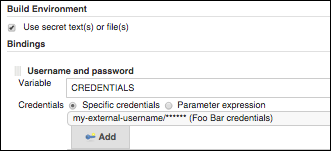
For a username/password pair, the plugin will inject the pair as a single value
joined by :. You can split the credentials into their respective parts
using bash string manipulation operators like % and #.
Assuming you configured the job to inject a variable named CREDENTIALS, you can do:
[parsing Jenkins secret credentials with bash]
123456
USERNAME=${CREDENTIALS%:*}PASSWORD=${CREDENTIALS#*:}# proof of concept - don't echo this in real life :)echo USERNAME=$USERNAMEecho USERNAME=$PASSWORD
]]><![CDATA[Jenkins Job to export Rackspace Cloud DNS Domain As BIND Zone Files]]>2014-12-15T09:39:33-05:00http://steve-jansen.github.io/blog/2014/12/15/jenkins-job-to-export-rackspace-cloud-dns-domain-as-bind-zone-filesRackspace Cloud DNS offeres a great web console, along with a solid API for managing
DNS records dynamically from CM tools like Chef.
The web UI @ https://mycloud.rackspace.com doesn’t (yet) suppport an action to
export your domain(s) to standard BIND format zone files.
I wanted to create a scheduled Jenkins job to export a domain managed by
Cloud DNS to GitHub for both versioning and disaster recovery.
One gotcha with the API is it’s asynchronous – you request an export, then
periodically poll on the status of the export. The API also has rate limiting.
So, the export is a bit more involved than a simple curl call.
Here’s the basis of the script I used in a Jenkins job to export a domain and subdomains
every 15 minutes, alongw with the Git publisher for Jenkins to push the changes back to
a GitHub repo.
]]><![CDATA[Troubleshooting GitHub WebHooks SSL Verification]]>2014-12-03T10:28:37-05:00http://steve-jansen.github.io/blog/2014/12/03/troubleshooting-github-webhooks-ssl-verificationGitHub WebHooks and Jenkins go together like peanut butter and jelly.
SCM Webhook trggers are way more efficient for Jenkins over SCM polling. Webhooks also give you a great UX – Jenkins reacts
immediately when you push a commit or open a pull request.
I am a huge fan of using GitHub OAuth for single sign on with Jenkins.
The security of OAuth really depends on TLS/SSL for protecting the token in transit,
so your Jenkins should use SSL when using GitHub OAuth.
GitHub’s Webhooks have the option to perform SSL certificate validation. I’ve
run into issues with GitHub’s “Hookshot” HTTP engine failing SSL verification for
otherwise valid certificates. Most of my problems were related to installing
intermediate CA certificates on Jenkins.
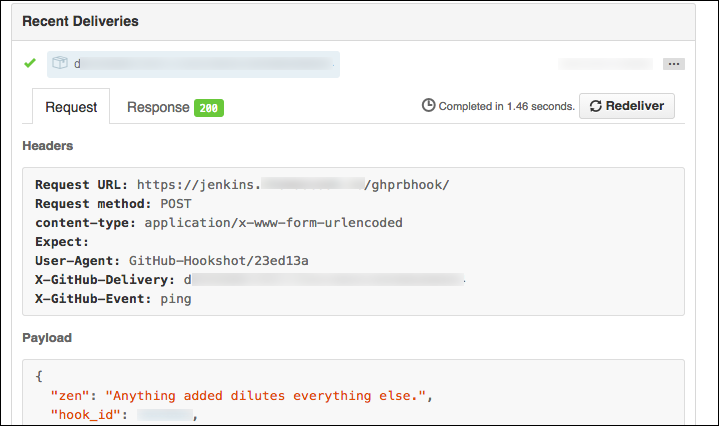
GitHub WebHook configuration and SSL certificate verification
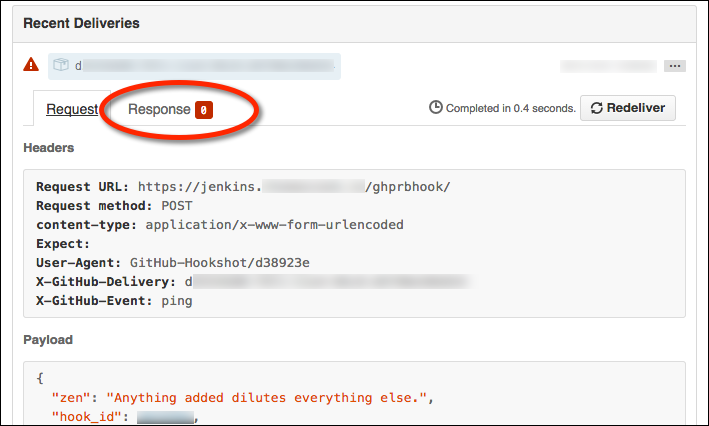
Here’s an example of a pull request webhook failing SSL validation in GitHub:
GitHub will send a “hello, world” webhook ping when you create a new webhook. Note
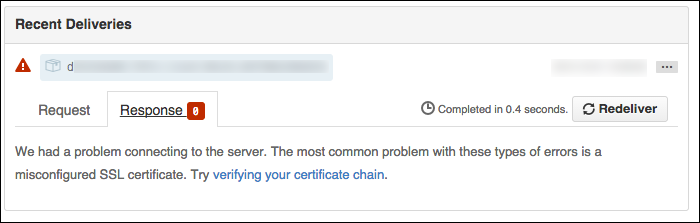
that SSL verification failures will have an usual HTTP response code of 0:
The response tab will be empty:
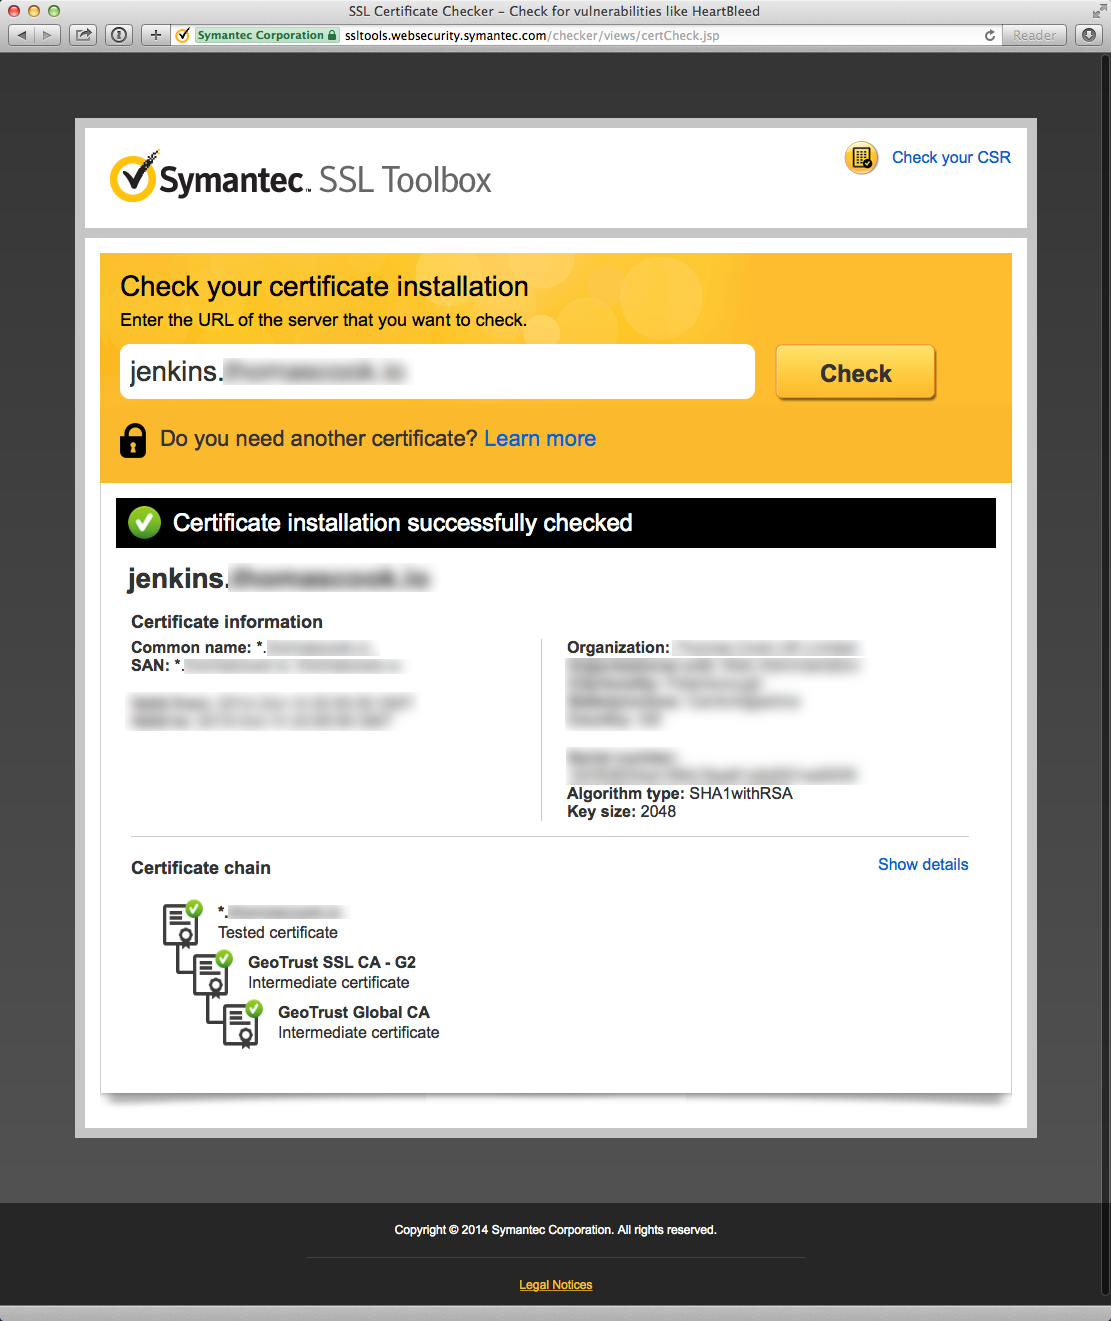
Troubleshoot your SSL certificate with the Symantec SSL Toolbox
Symantec offers a very helpful tool to check your certificate installation
as part of their “SSL Toolbox”. The tool offers suggestions to remedy certificate
issues and links to download missing intermediate CA certificates.
Here’s an example of a Symantec diagnostic failure due to a missing intermediate certificate:
Using the Symantec SSL Toolbox against servers with IP ACLs
A great feature of the Symantec SSL Tool is how the tool supports non-public servers
behind a firewall. The tool will first attempt to verify your cert from
a Symantec server. If your server is behind a firewall that denies public access
except for whitelisted origins, the SSL toolbox has a fallback mode to run a Java applet
in your browser. The applet will perform the SSL verification
requests from local machine rather than a Symantec server.
TIP: GitHub publishes their public IP range for webhooks as part of the
GitHub metadata API if you wish to create firewall
whitelist rules for GitHub webhook requests.
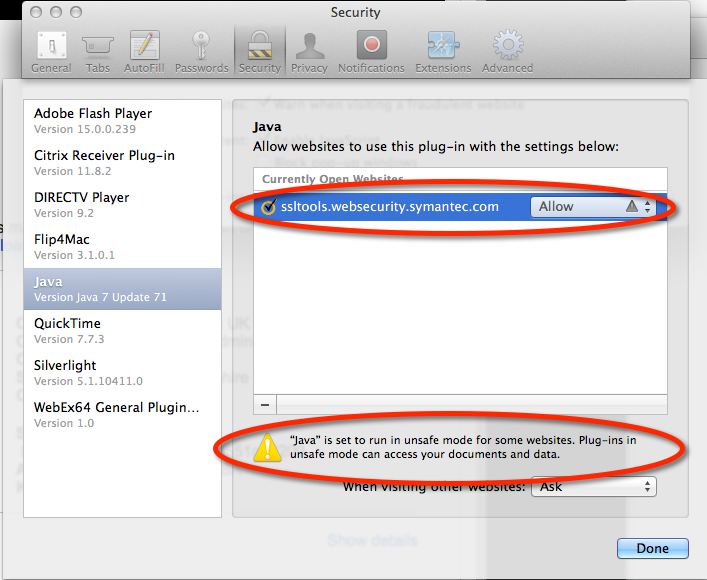
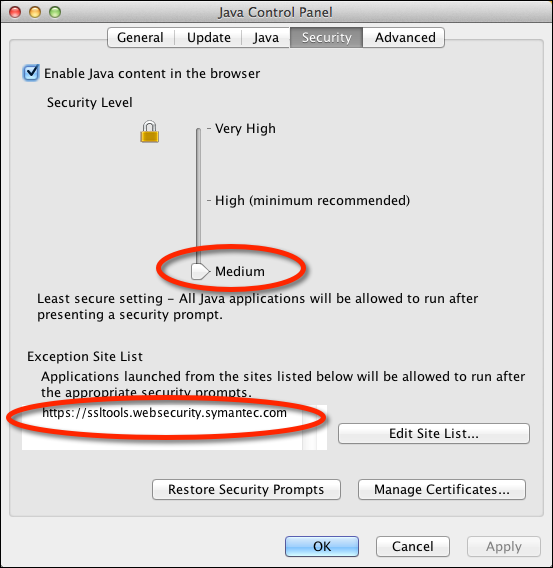
Symanetc SSL Toolbox Applet and OS X Java security
Given the recent security vulnerabilities of Java applets, getting the applet to run
on OS X takes some work. Here are the setting I need to use the applet in Safari 7.1
on OS X 10.9.5 (Mavericks) using the Oracle/Sun JRE 1.7 R71.
(I never succeeded in using the applet in Firefox or Chrome despite serious effort.)
I needed to enable Safari to run the SSL Toolbox applets in “unsafe mode” without prompting:
I also had to temporarily downgrade the JVM 1.7 browser security level to “Medium” and
add an execption for https://ssltools.websecurity.symanttec.com:
Green is good!
Once you’ve resolved your certificate issues, you should see green in both the
Symantec SSL Toolbox and the GitHub WebHook requests after enabling SSL verification.
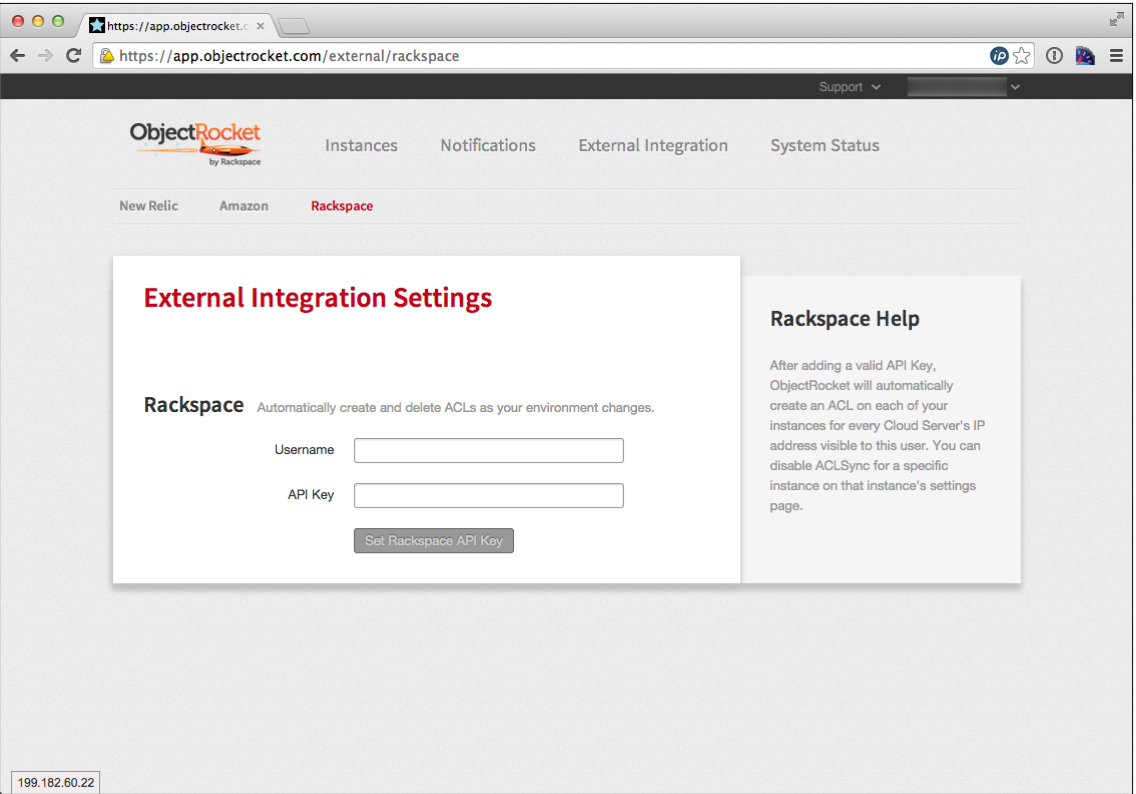
]]><![CDATA[Integrating Rackspace Auto Scale Groups with ObjectRocket Mongo databases]]>2014-12-01T13:00:58-05:00http://steve-jansen.github.io/blog/2014/12/01/integrating-rackspace-auto-scale-groups-with-objectrocket-mongo-databasesThanks to some pretty awesome support from Jon Fanti and John Moore at ObjectRocket,
I learned this week that we had missed two key optimizations for using ObjectRocket MongoDBs with Rackspace
Auto Scaling groups (ASGs).
ServiceNet
First, ObjectRocket support can provide medium and large customers with a server FQDN that resolves to a
ServiceNet private IP.
You can use this FQDN instead of the server name shown in the connect string for your instance. As long
as your cloud servers and ObjectRocket are in the same Rackspace data center, the ServiceNet connection string
will avoid data transfer charges and keep your packets from transiting the public Internet.
Dynamic IP ACLs
We struggled to manually maintain the list of authorized IPs for our ObjectRocket MongoDB instances
when a ASG would add a new node. We had a backlog plan to script the IP ACLs using Chef, but, hadn’t
found the time yet.
According to John, the ObjectRocket integration with your Rackspace Cloud account will automatically sync
the IP ACLs with your list of current Cloud VMs. Moreover, the integration will ignore any manual IP ACLs
you create (as long as your description doesn’t use the rax- prefix).
]]><![CDATA[How to use Jenkins to monitor cron jobs]]>2014-11-20T17:46:46-05:00http://steve-jansen.github.io/blog/2014/11/20/how-to-use-jenkins-to-monitor-cron-jobsCron jobs have a funny way of being ignored. Either no one knows the job is failing because the job
doesn’t tell anyone. Or, the job is spamming your e-mail inbox many times a day, regardless of success
or failure, which means you just ignore the e-mails.
I’ve seen the “Monitor an external job” option for new Jenkins jobs before, and never paid much attention.
Turns out it’s a great bucket for storing logs and results of cron jobs.
The external-monitor-job plugin
seems to ship with the Jenkins war file. So, your Jenkins should have it out of the box.
Creating a job is pretty simple. It’s just a name and description. Click “New Item” in Jenkins and
select the “Monitor an external job” option. This creates a job of type hudson.model.ExternalJob.
The wiki describes a
fairly complicated method to download the Jenkins jar files onto the server running
your cron jobs, and then use the Java runtime to run a jar with your cron script as an
argument. The jar presumably forks your a new shell to run your desired cron command and
sends the output/result to Jenkins.
There’s a much easier way to do this. Redirect or tee your job’s stdout/stderr output to a
temp file. Then post the result code and log file via curl to Jenkins. No need to
download jar files. No need to even have Java runtime on the server.
Just POST a small XML document with the log contents (binary encoded) and the
exit code to Jenkins @ /job/:jobName/postBuildResult where :jobName is the
URL encoded name of your monitoring job in Jenkins.
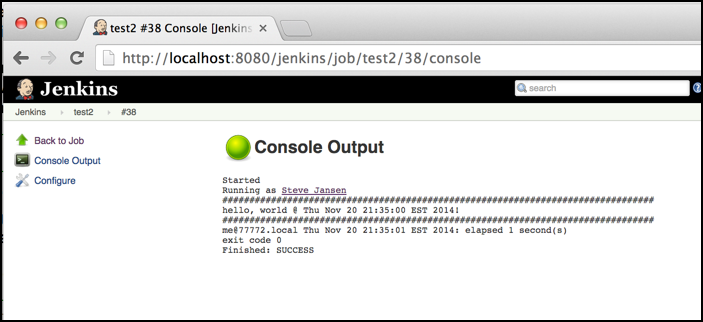
#!/bin/sh# example cron script to post logs to Jenkins# exit on errorset -e
log=`mktemp -t tmp`timer=`date +"%s"`jenkins_job=my_monitoring_job
jenkins_server=http://jenkins.example.com:8080/jenkins/job/$jenkins_job/postBuildResult
# see http://jenkins.example.com:8080/me/configure to get your username and API tokenjenkins_username=myusername
jenkins_token=abcdef0123456789fedcba9876543210
function banner(){echo$(printf'#%.0s'{1..80}) >> "$log"}function report(){result=$?timer=$((`date +"%s"`-$timer)) banner
echo"`whoami`@`hostname -f` `date`: elapsed $timer second(s)" >> "$log"echo"exit code $result" >> "$log"# binary encode the log file for Jenkinsmsg=`cat "$log" | hexdump -v -e '1/1 "%02x"'`# post the log to jenkinsecho curl -X POST \ -u "$jenkins_username:$jenkins_token"\ -d "<run><log encoding=\"hexBinary\">$msg</log><result>$result</result><duration>$timer</duration></run>"\$jenkins_server/job/$jenkins_job/postBuildResult
}trap report EXIT;
banner
echo"hello, world @ `date`!" | tee "$log"
A sample of the build log on Jenkins with a green/red build status:
Credit to Taytay on Stackoverflow.com
for figuring out how to use hexdump to properly encode the XML for Jenkins.
]]><![CDATA[Finding Chef nodes bootstrapped in the last X hours]]>2014-10-17T18:47:44-04:00http://steve-jansen.github.io/blog/2014/10/17/finding-chef-nodes-bootstrapped-in-the-last-x-hoursI needed to write a script to garbage collect old nodes in Chef related to
auto-scaling groups.
I decided to search for nodes bootstrapped in the last X hours.
I experimented with ways to find nodes that have been up for less than X hours.
In this example, I search for nodes that have been up for 8 hours or less.
Of course, this assumes you never restart your nodes:
I also tried finding nodes that converged in the last 8 hours (which would have
to be combined with some other filter of course):
1
knife exec -E 'b = Time.now.to_i; a = (b - (8*60*60)).to_i; search(:node, "ohai_time:[#{a} TO #{b}]") { |n| puts n.name }'
Overall, I think the easiest option is to just set a node attribute like
‘bootstrap_date’ at bootstrap (or set it if it’s nil). This would be a clearcut
way to find out how old a node truly is.
One of my colleagues pointed out that Chef Metal
sets a very handy node['metal']['location']['allocated_at'] attribute that gets
the job done if you are spinning up new nodes with metal.
]]><![CDATA[regexes for the serverspec 2 update]]>2014-10-03T18:24:25-04:00http://steve-jansen.github.io/blog/2014/10/03/regexes-for-the-serverspec-2-updateThe Serverspec team just released v2 of their outstanding testing library
today, after a very long beta period. The v2 release had a
few breaking breaking changes
due to dropped rspec matchers that had been deprecated.
If your test-kitchen tests recently broke today,
here’s a few regexes I used with Sublime Text’s regex find/replace
to rewrite the dropped matchers for the new matchers.
]]><![CDATA[Chef'ing custom nginx configs with the nginx cookbook]]>2014-08-27T19:41:10-04:00http://steve-jansen.github.io/blog/2014/08/27/chefing-custom-nginx-configs-with-the-nginx-cookbookThe nginx cookbook has been
super helpful Chef’ing some web apps recently. One thing I struggled to
understand was how to use my own custom conf, like /etc/nginx/nginx.conf, that
is optimized for how I use nginx.
One solution I tried, which is probably a Chef anti-pattern, is to only include
the nginx cookbook on the initial converge:
The Wrong Way
1234567891011121314
# the nginx community cookbook will relentlessly revert conf files,# so avoid running it unless nginx isn't installed,# or we explicitly reset/delete the node attributeinclude_recipe'nginx'unlessnode['nginx']['installed']node.set['nginx']['installed']=true# our custom nginx.conftemplate'/etc/nginx/nginx.conf'dosource'nginx.conf.erb'owner'root'group'root'mode'0644'notifies:reload,"service[nginx]",:delayedend
I knew this was wrong when I wrote it. Chef is all about idempotency.
But, I couldn’t figure out a way to keep the nginx cookbook from reverting my
custom conf during subsequent converges, only to have my template restore my
custom conf a few seconds later.
The Better Way
The OpsCode blog Doing Wrapper Cookbooks Right shows the right way, and really opened my eyes on the power of
Chef’s two phase model (compile, then converge).
123456
include_recipe'nginx'# use our custom nginx.conf, rather than the one that ships in the nginx cookbook# this avoids the nginx and my-app cookbooks from fighting for control of# the same target fileresources('template[nginx.conf]').cookbook'my-app'
]]><![CDATA[json-proxy release 0.2.0]]>2014-07-19T10:20:56-04:00http://steve-jansen.github.io/blog/2014/07/19/json-proxy-release-0-dot-2-0Happy to announce a new release of json-proxy, a
utility for HTML5 devs to run apps locally and proxy calls like http://localhost:9000/api to
a remote server, all without CORS or JSONP.
Grunt Plugin
This release includes better support for running as a grunt plugin.
A change in grunt-contrib-connect@0.8.0
simplifies life for proxy plugins inside the livereload task of grunt serve:
12345678910111213141516171819202122
livereload:{options:{middleware:function(connect,options,middlewares){// inject json-proxy to the front of the default middlewares array// requires grunt-contrib-connect v0.8.0+middlewares.unshift(require('json-proxy').initialize({proxy:{forward:{'/api/':'http://api.example.com:8080'},headers:{'X-Forwarded-User':'John Doe'}}}));returnmiddlewares;}}}
You can now pass your authentication credentials to a HTTP proxy gateway on
your LAN via the proxy.gateway.auth config setting. The setting value
uses the username:password format for HTTP basic authentication
(without base64 encoding). Here’s an example config to proxying remote request
via http://proxy.example.com:8080 as proxyuser with password C0mp13x_!d0rd$$@P!
This was necessary since version prior to 1.0 are no longer actively supported.
Housekeeping
There’s better unit test coverage, and the code validates against a
reasonable set of jshint linting rules.
]]><![CDATA[Including another berksfile in your berksfile]]>2014-05-06T13:11:57-04:00http://steve-jansen.github.io/blog/2014/05/06/including-another-berksfile-in-your-berksfileAs part of my cooking with Chef’s new workflow,
I wanted Berkshelf to dynamically import the secondary dependencies of my site-cookbook’s dependencies.
# vi:ft=ruby:site:opscode# Extension method to import secondary dependencies in a referenced site-cookbook# using the constraints in the site-cookbook's Berkshelf file, rather than just# the name of the dependencies in the site-cookbook's metadata.rb file## credit: https://sethvargo.com/berksfile-magic/# https://coderwall.com/p/j72egwdefsite_cookbook(path)berksfile="../#{path}/Berksfile"ifFile.exists?(berksfile)contents=File.read(berksfile)# comment out lines like `site :opscode`, which cannot be imported multiple timescontents=contents.gsub(/(^\s*site\s)/,'#\1')# comment out lines like `metadata`, which cannot be imported multiple timescontents=contents.gsub(/(^\s*metadata\s)/,'#\1')instance_eval(contents)endendcookbook'nginx','~> 2.4.4'site_cookbook'my-site-cookbook'
Happy cooking!
]]><![CDATA[Adding Chef encrypted data bags to source control]]>2014-05-05T15:54:25-04:00http://steve-jansen.github.io/blog/2014/05/05/adding-chef-encrypted-data-bags-to-source-controlI’ve been using Chef for a bit now and generally a huge fan of the new
Chef workflow.
We are working hard to attain true continuous delivery and test driven development with Chef.
The devil is in the details now.
One small wrinkle in our effort has been marrying encrypted data_bags with our chef-repo in GitHub.
I don’t want to type the optional argument --secret-file ~/.chef/encrypted_data_bag_secret everytime I interact with a data bag. So, I added this option to my ~/.chef/knife.rb file.
However, this precludes me from easily exporting the edited file to disk. The export will always be my secret plaintext,
not the encrypted ciphertext. Not exactly what you want to commit to GitHub.
123
knifedata_bagcreateusersjenkins# DON'T COMMIT THIS... the exported file will be unencryptedknifedata_bagusersjenkins--format=json>data_bags/users/jenkins.json
So, I decided to create a bash alias to temporarily disable the knife.rb setting and export the data bag to a file:
This bash function comments out the secret file option in knife.rb using sed’s in-place editing.
Now I can commit the data bag in its encrypted format:
123
knife-ciphertextdata_bagshowusersjenkins>data_bags/users/jenkins.jsongitadddata_bags/users/jenkins.jsongitcommit-m'adding the latest jenkins data bag'
Happing cooking!
]]><![CDATA[A better IIS Express console window]]>2014-03-16T18:18:34-04:00http://steve-jansen.github.io/blog/2014/03/16/a-better-iis-express-console-windowIIS Express is the de facto server to use for local development of ASP.NET MVC and Web Api apps. It’s just like it’s big brother IIS
minus a few features rarely used for local development.
Unlike it’s big brother, IIS Express runs on demand as a regular console app under the security context of
your current login. This makes it much easier to start and stop debugging sessions.
Being a console app is great – you can see System.Diagnostics.Debug.Print and System.Diagnostics.Trace.Write
output right in the console alongside IIS’ usual log statements for HTTP requests.
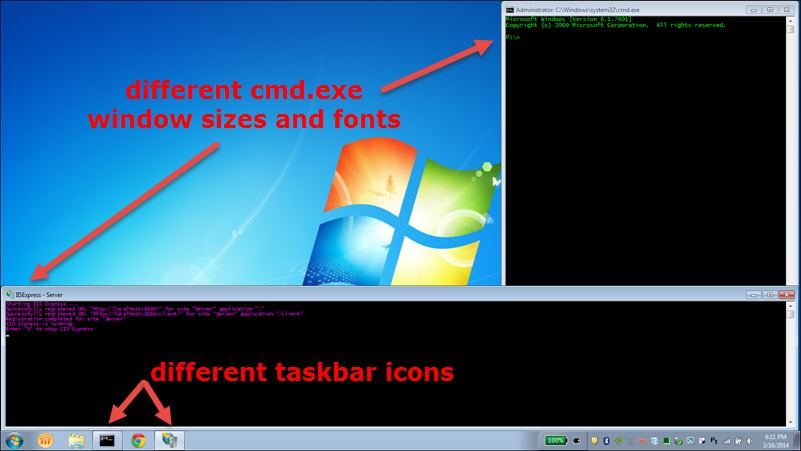
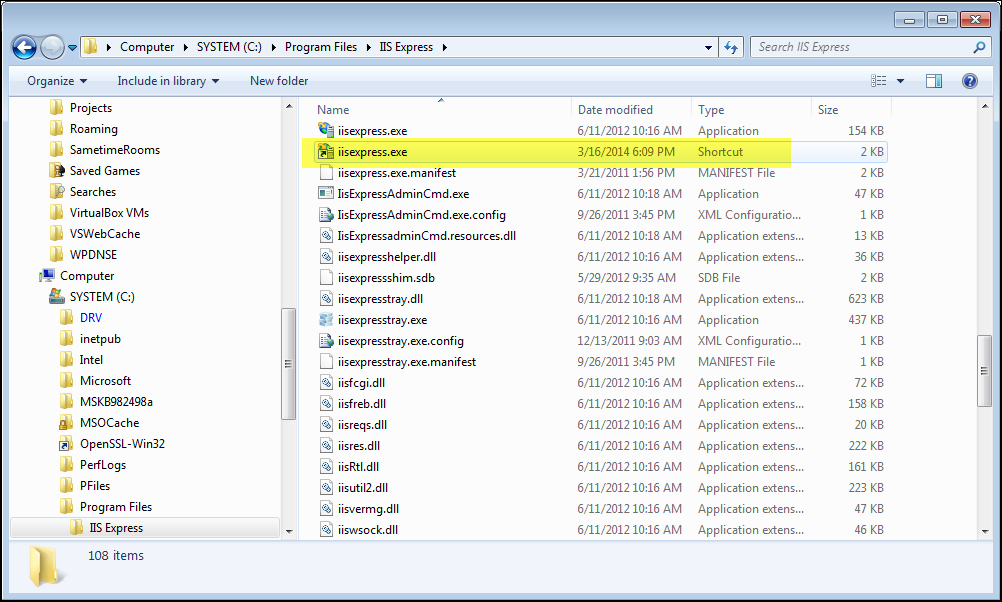
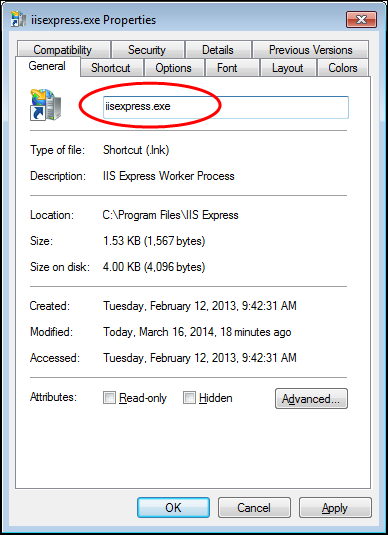
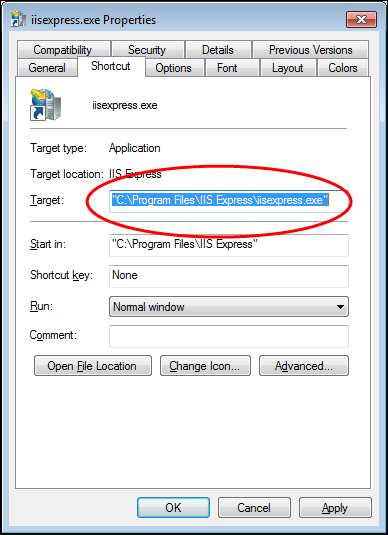
A really useful trick is to create a Windows Explorer shortcut to iisexpress.exe, and open that shortcut iisexpress.exe.lnk file instead of directly
opening iisexpress.exe. There are two benefits to this:
iisexpress.exe gets a dedicated icon on the Windows taskbar. In the screenshot below, I can WinKey + 5 to quickly switch to my IIS Express
console output. (WinKey + N focuses/opens the Nth item on the taskbar; repeat as needed if you have multiple windows grouped for that taskbar icon).
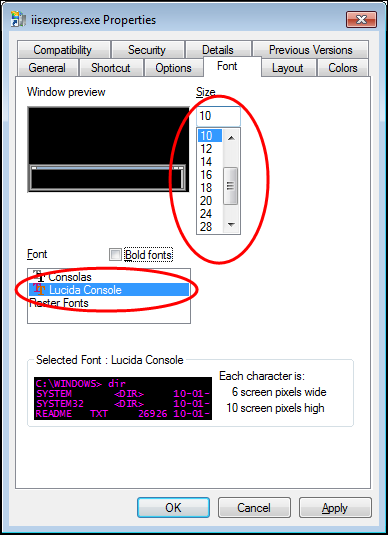
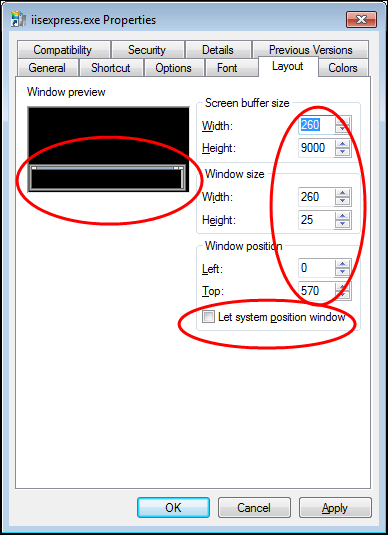
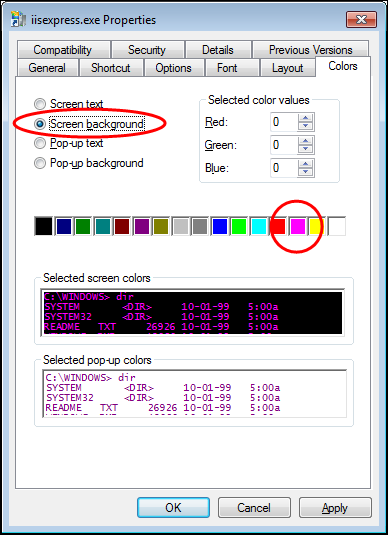
I can customize the command prompt preferences for just iisexpress.exe. In the screenshot below, I’m using a smaller font in purple color, with the
window stretched the entire 1600 pixel width of my display. This helps greatly with the readability of long lines of text in the console output.
Here’s a closer look at the console ouptut:
Here are screenshots of the Explorer settings I used for C:\Program Files\IIS Express\iisexpress.exe.lnk:
]]><![CDATA[How To verify administrative rights in a Windows batch script]]>2014-03-15T18:50:08-04:00http://steve-jansen.github.io/blog/2014/03/15/how-to-verify-administrative-rights-in-a-windows-batch-scriptWhile working on automated provisioning of a Jenkins slave server on Windows, I needed
to verify that one of my batch scripts was running with administrative privileges.
Turns out this problem is easy to solve these days as long as you don’t need to support
XP. Thanks to and31415 on SO for the
great post on using fsutil!
Here’s a working example:
1234567891011121314151617181920
@ECHO OFFSETLOCAL ENABLEEXTENSIONS:: verify we have admin privilegesCALL :IsAdmin || (ECHO %~n0: ERROR - administrative privileges required && EXIT /B 1)ECHO "Hello, Admin!":EXITEXIT /B:: function to verify admin/UAC privileges:: CREDIT: http://stackoverflow.com/a/21295806/1995977:IsAdminIF NOT EXIST "%SYSTEMROOT%\system32\fsutil.exe" ( ECHO %~n0: WARNING - fsutil command not found; cannot verify adminstrative rights) ELSE ( "%SYSTEMROOT%\system32\fsutil.exe" dirty query "%SystemDrive%" >NUL 2>&1)EXIT /B
]]><![CDATA[Configuring Vagrant to dynamically match guest and host CPU architectures]]>2014-03-14T20:06:26-04:00http://steve-jansen.github.io/blog/2014/03/14/configuring-vagrant-to-dynamically-match-guest-and-host-cpu-architecturesToday a work colleague put together a nice Vagrantfile to run a Linux dev environment on our laptops. Vagrant
is sweet for DevOps. The Vagrant file worked great on his Macbook Pro.
But it was no dice running on my Windows box – the VM was a 64-bit Linux VM (why wouldn’t a server be 32-bit?) and I’m on a
32-bit laptop (don’t ask why my corporate IT still issues 32-bit Windows images on 64-bit hardware!).
To my surprise, VirtualBox can actually a 64-bit guest VM on a 32-bit host OS:
If you want to use 64-bit guest support on a 32-bit host operating system, you must also select a 64-bit operating system for the particular VM. Since supporting 64 bits on 32-bit hosts incurs additional overhead, VirtualBox only enables this support upon explicit request.
However, I learned Vagrant cloud boxes may forget to explicity declare they want VirtualBox to enable 64-on-32 support. While changing the box “Operating System Type” from “Ubuntu” to “Ubuntu (64 bit)” would be
an easy fix, I decided to see if Vagrant could dynamically choose the right guest CPU architecture based on the host OS’ CPU architecture.
Our app would run as either 32 or 64, so it made sense to run 32 on 32 and 64 on 64, right?
Turns out it is quite easy. The power of ruby as the config language for Vagrant really shines here:
Here the relevant changes to our Vagrantfile to get Vagrant to run a 64-bit Linux guest on 64-bit hosts,
and a 32-bit Linux guest on 32-bit hosts:
1234567891011121314151617
# -*- mode: ruby -*-# vi: set ft=ruby :Vagrant.configure("2")do|config|config.vm.box="hashicorp/precise64"config.vm.box_url="https://vagrantcloud.com/hashicorp/precise64/current/provider/virtualbox.box"# support 32 windows hosts :(ifENV["PROCESSOR_ARCHITECTURE"]=="x86"puts"falling back to 32-bit guest architecture"config.vm.box="hashicorp/precise32"config.vm.box_url="https://vagrantcloud.com/hashicorp/precise32/current/provider/virtualbox.box"end# ... lots more vagrant plugin and chef goodness ...end
]]><![CDATA[Tips for Vagrant on Windows]]>2014-03-13T05:55:12-04:00http://steve-jansen.github.io/blog/2014/03/13/tips-for-vagrant-on-windowsI learned some interesting things today about running Vagrant on a Windows machine.
Vagrant is an amazing tool for running a VM on your local dev box with a target platform (e.g., Linux)
provisioned by code (e.g., Chef/Puppet/shell scripts).
Spaces in Paths
A hard lesson about Vagrant on Windows was Vagrant uses Ruby heavily, and Ruby on Windows
really, really doesn’t like spaces in paths.
If your Windows username (or %USERPROFILE% path) include spaces, you will need to set an environmental variable %VAGRANT_HOME% to a path that
does not use spaces. This caused many non-obvious errors with vagrant plugin install berkshelf and vagrant plugin install omnibus.
A simple fix was setting %VAGRANT_HOME% to “C:\VagrantHome”
Example running a simple 32-bit Ubuntu LTS box on 32-bit Windows 7 SP1
I don’t really need the omnibus plugin here, but, this proves it can install a plugin that would
otherwise fail with spaces in the %USERPROFILE% path.
]]><![CDATA[Binding Jenkins to port 80 on SUSE Linux]]>2014-03-05T18:09:00-05:00http://steve-jansen.github.io/blog/2014/03/05/binding-jenkins-to-port-80-on-suseI’ve been helping an awesome colleague on DevOps for our Jenkins farm, which we use
for continuous integration and continuous deployment to our preproduction environments.
We are really trying to do it right:
Use Puppet to provision the Jenkins master, Linux VM build slaves, Windows VM slaves,
and even OS X bare metal slaves (for iOS builds)
Automated backups of Jenkins config files to a private GitHub repo for disster recovery
Patches the GitHub OAuth plugin to make sure you have the same collaborator permissions
(read/write/admin) in a Jenkins job as you do the GitHub repo.
Have a Jenkins staging environment to test upgrades to Jenkins and plugins to avoid surprises.
Run Jenkins on the Long Term Support (LTS) release channel to avoid surprises.
I wish my shop used CentOS or Debian; sadly we are stuck on SUSE Enterprise. SUSE is really
good at turning 5 minute tasks on CentOS or Debian into uber frustrating hour-long ordeals.
One of the glitches we faced was running the Jenkins web UI on port 80. SUSE lacks the
authbind package for binding to port below port 1024 as a non-root user. We wanted to run the
Jenkins deamon as a regular privilege user, so running as root was not an option.
We are currently smoke testing this LSB /etc/init.d/jenkins.portforwarding script, which is
just a wrapper around iptables. So far, it seems to get the job done.
]]><![CDATA[A better FTP client for Windows you already have: Git bash's curl command]]>2014-02-15T17:24:00-05:00http://steve-jansen.github.io/blog/2014/02/15/a-better-ftp-client-for-windows-you-already-have-gits-curl-commandMy shop has a couple of internal FTP servers to mirror commonly used installers for .Net devs.
Installers for apps like Visual Studio can be huge, so GitHub isn’t the best place for this, and
it would also smoke most of our Dropbox quotas. So an FTP server seems like the 3rd best option.
We are a geographically distributed team, with a VPN to access internal servers. Even with a reliable
VPN session over ISP fiber connection, I’ve experience lots of realiability problems downloading large files
with the native Windows Explorer / Internet Explorer FTP.
The Windows ftp command line client can be a pain to work with. Fortunately, the Git bash emulator for Windows
(msysgit) includes a MinGW port of the awesome curl utility. The curl utility has all kinds of awesome features
for downloading large files.
-C - option tells bash to automatically continue an interrupted download, if the server supports this feature.
-v prints verbose stats, including an dynamic progress info
-O automatically saves the file using the remote file name to the current working directory
I crafted this gist to enable downloading a large number of binaries related to .Net development from our FTP server.
Be warned, this hack spawns a new command prompt window for each download, so it can get a bit crazy. This seemed like
the best worst way to download in parallel while also making sense of each download’s status.
]]><![CDATA[Breaking the 3GB memory barrier of 32-bit Windows]]>2013-10-03T22:22:02-04:00http://steve-jansen.github.io/blog/2013/10/03/breaking-the-3gb-memory-barrier-of-32-bit-windowsMy corporate laptop has 6 GB of RAM installed, but, only sees 3 GB of logical RAM. Why? My corporate IT department
images laptops with the 32-bit flavor of Windows 7.
As you can see in this screenshot from my Control Panel’s System information applet, installing more memory hits a glass ceiling with Windows at ~3GB.
My laptop has 6 GB of physical RAM installed, yet my user applications have access to less than half of the physical memory!
Hacking a Solution: “Physical Virtual Memory”
Fortunately, there is a solution to this problem. It’s a hack and it uses a reasonably priced piece of 3rd party commercial software.
The solution combines a feature of Windows known as Physical Address Extensions (PAE) in tandem with a RAMDISK as the storage “disk” for the virtual memory paging file. The result is a total hack – we’re using a page file to expose the address space of physical memory. It’s “physical virtual” memory. An oxymoron if I ever heard one!
A commercial software package called Primo Ramdisk Standard by Romex Software is needed to create the Ramdisk. It’s $30/seat.
This is the only Ramdisk driver I could find that:
Not flagged as a removable storage device by our corporate data loss prevention nanny software
Performance
Indeed, the performance of this hack to use “physical virtual memory” will be less than just using a 64 bit O/S with it’s address space of 264 bytes. Nevertheless, paging to a RAMDISK will always beat paging to a magnetic hard drive, and will probably beat paging to a SSD disk as well.
I speculate there are a number of very good reasons why corporate IT would deploy 32-bit over 64-bit – availability of 64-bit client software for VPNs, anti-malware, remote backup agents, remote support agents, encryption policy engines; the difficulty in recreating and testing a new image from scratch; the density of older 32-bit laptops still in use.
Known Issues
Caveat Emptor: You must disable hibernation mode. Hibernating sporadically crashes upon shutdown or startup when using this hack. The good news is you will not miss much. My laptop clocked faster times with a normal shutdown/startup cycle compared to the time required to enter and exit hibernation. The disk IO was just too slow to copy 6 GB of RAM contents to into and out of the C:\hiberfil.sys hibernation file.
Testing
This setup was tested successfully for over one year on a Lenovo ThinkPad T410 with 6 GB of RAM (2 GB +4 GB DIMMS) as well as one year on a Lenovo T420s with 8 GB of RAM. Please test your setup. Should your machine fail to restart after following below steps, you should boot into Windows Safe Mode and disable/uninstall the RAMDISK driver and paging file.
Setup (8 steps)
Step 1
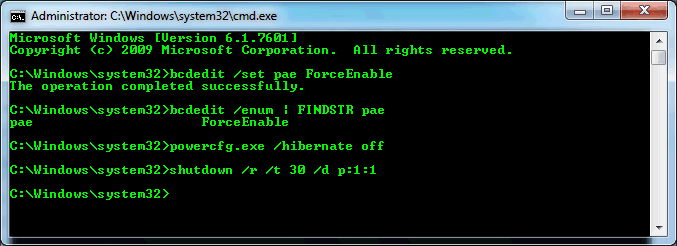
Enable PAE in the Windows boot options, disable hibernation in the power options for Windows, and reboot the system.
Run the following commands in Command Prompt (cmd.exe). Note this will force a restart in 30 seconds, so save your work.
Install the commercial software Primo Ramdisk Standard by a vendor named Romex. There is a $30/seat license cost. Romex offers a 30 day free trial.
Step 3
Launch the Primo Ramdisk configuration program. (“%ProgramFiles%\Primo Ramdisk Standard Edition\FancyRd.exe”)
Step 4
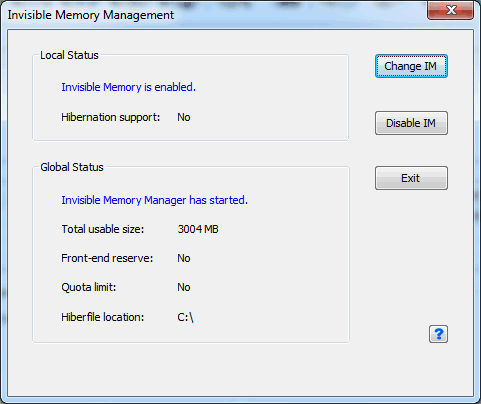
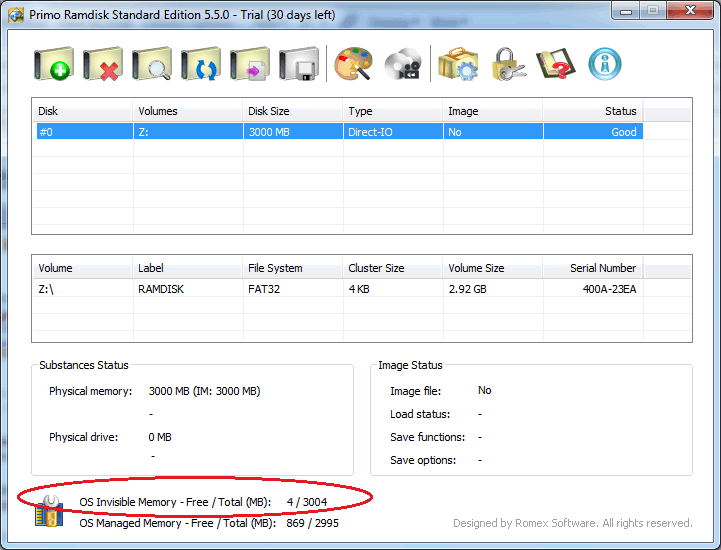
Launch the dialog to configure “Invisible Memory Management”
Click the icon in the lower right corner of the configuration program that resembles an blue SD Card and a yellow wrench. On the dialog, click the “Enable IM” button. The default options worked successfully a Lenovo ThinkPad T410 (BIOS) and a Lenovo T420s (UEFI). See the Romex documentation on front-end/back-end reserve if you experience video card problems on your hardware.
Step 5
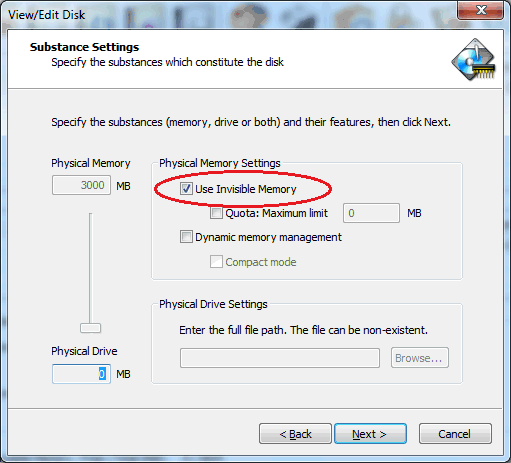
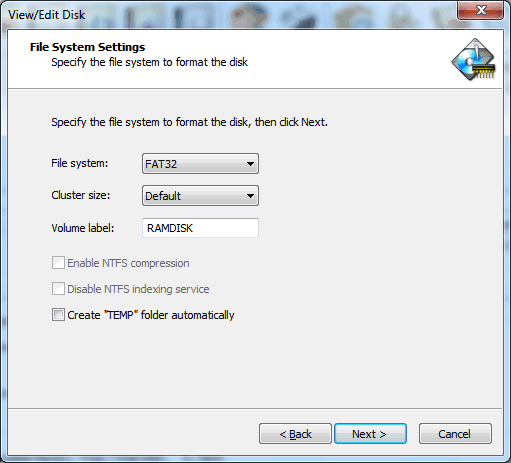
Define a new RAMDISK
a) Take note of the maximum amount of available invisible memory as displayed in the lower right hand corner of the main window. This will be the size of the RAMDISK.
b) Click the “Create a new disk” toolbar button to define a new persistent RAMDISK
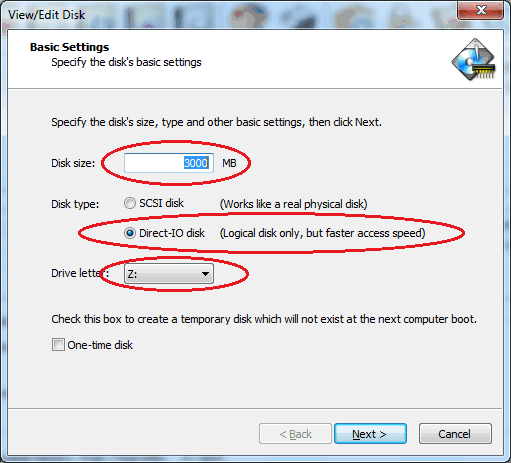
c) Select “Direct-IO” as the disk type. This is the faster of the two options. Also, Credant will only ignore this device type.
d) Assign a drive letter of “Z”. This can be changed, however, a later step will need to be manually adjusted.
e) Leave “One Time Disk” unchecked to make this disk persistent across boots.
f) On the next dialog screen, enable the option for “Use Invisible Memory”. Leave all other options unchecked/disabled.
g) On the final dialog screen, select the FAT32 format and label the device “RAMDISK”.
Screenshots:
Step 6
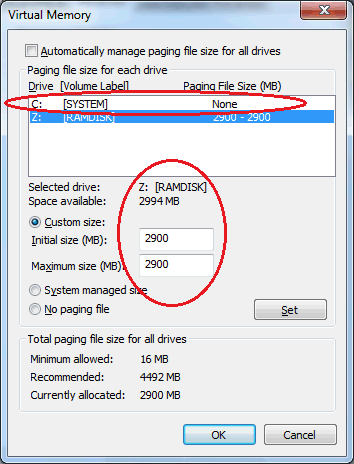
Modify Windows’ Virtual Memory settings
a) Run “sysdm.cpl” to open System Properties
b) Open the virtual memory dialog by selecting Advanced > Performance > Settings > Advanced > Virtual Memory > Change
c) Uncheck/disable “Automatically manage paging file size for all drives”
d) Select the “C:” drive in the drive list, and select the “No paging file” option. Click the Set button.
e) Select the “Z:” drive in the drive list, and select “Custom” size of X for initial and maximum, where X is the space available listed for the drive. You may need to slightly reduce X by ~5 megabytes.
f) Click the “Set” button and confirm your settings resemble the screenshot below. Click the “Ok” button.
Step 7
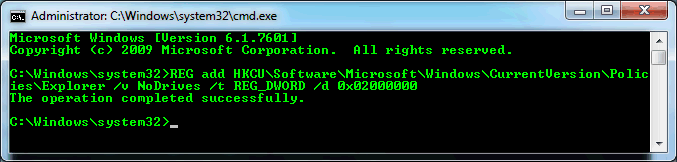
Hide the Z: drive from Explorer
Windows will be very annoying about the Z: drive being full. You can hide this drive from Explorer and the common dialogs with the following registry setting. Note you can still explicity access this drive with a full file path in any open/save dialog (e.g., Z:\folder\file.ext). If you changed the drive letter for the RAMDISK from Z: to something else, you will need to adjust the hex value of the registry key (see TechNet for the correct hex value).
Run the following commands in Command Prompt (cmd.exe):
My Windows setup recommends 3 GB of virtual memory. I’d like to try upgrading my physical RAM from 6 GB to 8GB. This would let me add another gigabyte to the paging file. It would also leave another 1 GB of free space on Z:. I’m considering using this free space as a NTFS junction point with “%TEMP%” and “%SYSTEMROOT%\TEMP” to make the temp folders both fast and non-persistent between reboots. (Junction points are the Windows equivalent of *nix symlinks for directories. You can use the Sysinternals utility junction.exe or the Primo Ramdisk utility to define junction points.)
I also want to test setting my IIS document root to Z: to make tests of deployment packages lightning fast (i.e., relocating the IIS document root from C:\inetpub to Z:\inetpub). This will make disk I/O way faster for copying scores of little image and text files. It also forces me to run an automated build/package/deploy between reboots (since Z:\ is wiped between reboots).
]]><![CDATA[Are great developers both left and right brain expressive?]]>2013-09-12T22:57:00-04:00http://steve-jansen.github.io/blog/2013/09/12/are-great-developers-both-left-and-right-brain-expressiveMy wondeful wife pointed to me this outstanding visualization of left vs. right brain expression.
It made me thing that a great developer is probably expressive on both sides: you clearly need the academic
properties of the left brain: logic, analysis, objectivity.
But the right side creativity is also going to
be needed to create something worth using, something that impacts our daily lives, something with an
outstanding user experience.
What do you think? Are great devs truly ambidextrous of the mind?
]]><![CDATA[GitHub sings the praises of a distributed workforce]]>2013-09-10T21:41:00-04:00http://steve-jansen.github.io/blog/2013/09/10/github-sings-the-praises-of-a-distributed-workforceTom Preston-Werner, co-founder of GitHub.com, highlights the competitive advantages behind a number
of company virtues I admire. A few of these virtues are organic growth, outstanding user experience, and a distributed workforce.
Below is an video excerpt from a fireside chat interview with Mr. Preston-Werner from July 2013, speaking to the benefits
of a remote workers, particularly developers:
One of the most memorable quotations from the interview is:
“Companies that aren’t distributed can’t possibly say that they hire the best people.”
I have the privilege of working at a great employer that also “gets it”. Most of my colleagues are remote workers across
nearly every time zone. Constraining your team to a single city is a self-imposed barrier,
particularly for creative work like coding that fits brilliantly with remote collaboration.