/* steve jansen */

// another day in paradise hacking code and more

Parsing Jenkins Secrets in a Shell Script

| Comments

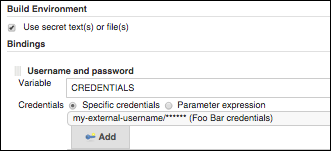
The Jenkins credentials-binding plugin provides a convenient way to securely store secrets like usernames/passwords in Jenkins. You can even inject these secrets into build steps as environmental variables in a job like this:

screenshot of a Jenkins job using the credentials-binding plugin

For a username/password pair, the plugin will inject the pair as a single value joined by :. You can split the credentials into their respective parts using bash string manipulation operators like % and #.

Assuming you configured the job to inject a variable named CREDENTIALS, you can do:

[parsing Jenkins secret credentials with bash]
1
2
3
4
5
6
USERNAME=${CREDENTIALS%:*}
PASSWORD=${CREDENTIALS#*:}

# proof of concept - don't echo this in real life :)
echo USERNAME=$USERNAME
echo USERNAME=$PASSWORD

Jenkins Job to Export Rackspace Cloud DNS Domain as BIND Zone Files

| Comments

Rackspace Cloud DNS offeres a great web console, along with a solid API for managing DNS records dynamically from CM tools like Chef.

The web UI @ https://mycloud.rackspace.com doesn’t (yet) suppport an action to export your domain(s) to standard BIND format zone files.

However, the API does support zone file exports, GET /v1.0/{account}/domains/{domainId}/export.

I wanted to create a scheduled Jenkins job to export a domain managed by Cloud DNS to GitHub for both versioning and disaster recovery.

One gotcha with the API is it’s asynchronous – you request an export, then periodically poll on the status of the export. The API also has rate limiting. So, the export is a bit more involved than a simple curl call.

Based on this Rackspace community support post, I found a great python utility, clouddns.py by Wichert Akkerman.

Note: I couldn’t use the https://github.com/rackspace/pyrax official SDK, as I’m on CentOS 6.5 with Python 2.6, and the SDK requires Python 2.7. I also tried the gist by DavidWittman but failed to get it working with the LON region despte following the clouddns README

Here’s the basis of the script I used in a Jenkins job to export a domain and subdomains every 15 minutes, alongw with the Git publisher for Jenkins to push the changes back to a GitHub repo.

Troubleshooting GitHub WebHooks SSL Verification

| Comments

GitHub WebHooks and Jenkins go together like peanut butter and jelly. SCM Webhook trggers are way more efficient for Jenkins over SCM polling. Webhooks also give you a great UX – Jenkins reacts immediately when you push a commit or open a pull request.

I am a huge fan of using GitHub OAuth for single sign on with Jenkins. The security of OAuth really depends on TLS/SSL for protecting the token in transit, so your Jenkins should use SSL when using GitHub OAuth.

GitHub’s Webhooks have the option to perform SSL certificate validation. I’ve run into issues with GitHub’s “Hookshot” HTTP engine failing SSL verification for otherwise valid certificates. Most of my problems were related to installing intermediate CA certificates on Jenkins.

GitHub WebHook configuration and SSL certificate verification

Here’s an example of a pull request webhook failing SSL validation in GitHub:
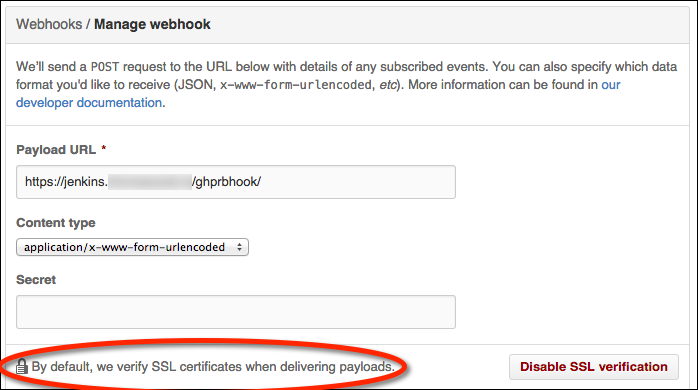
Screenshot of a failed certificate validation in a GitHub WebHook configuratioon screen

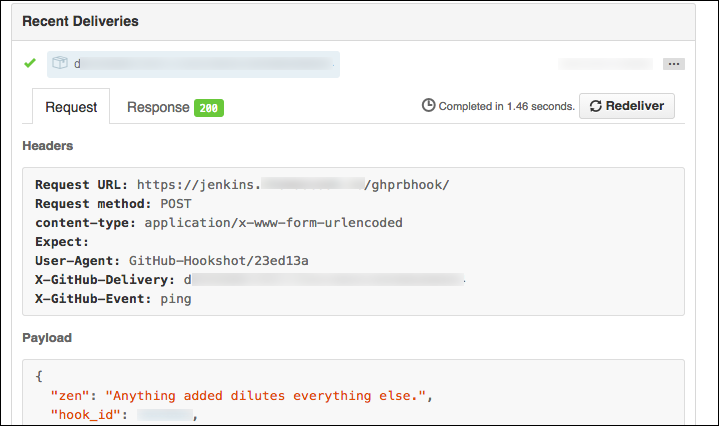
GitHub will send a “hello, world” webhook ping when you create a new webhook. Note that SSL verification failures will have an usual HTTP response code of 0: Screenshot of a "hello, world" webhook ping from GitHub
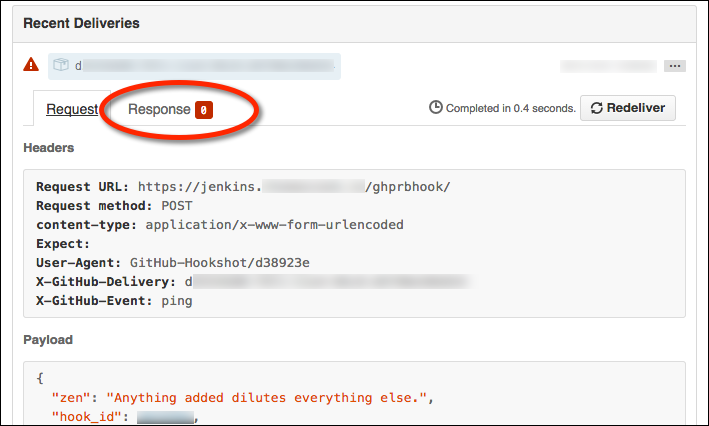
The response tab will be empty: Screenshot of a "hello, world" webhook ping from GitHub

Troubleshoot your SSL certificate with the Symantec SSL Toolbox

Symantec offers a very helpful tool to check your certificate installation as part of their “SSL Toolbox”. The tool offers suggestions to remedy certificate issues and links to download missing intermediate CA certificates.

Here’s an example of a Symantec diagnostic failure due to a missing intermediate certificate:
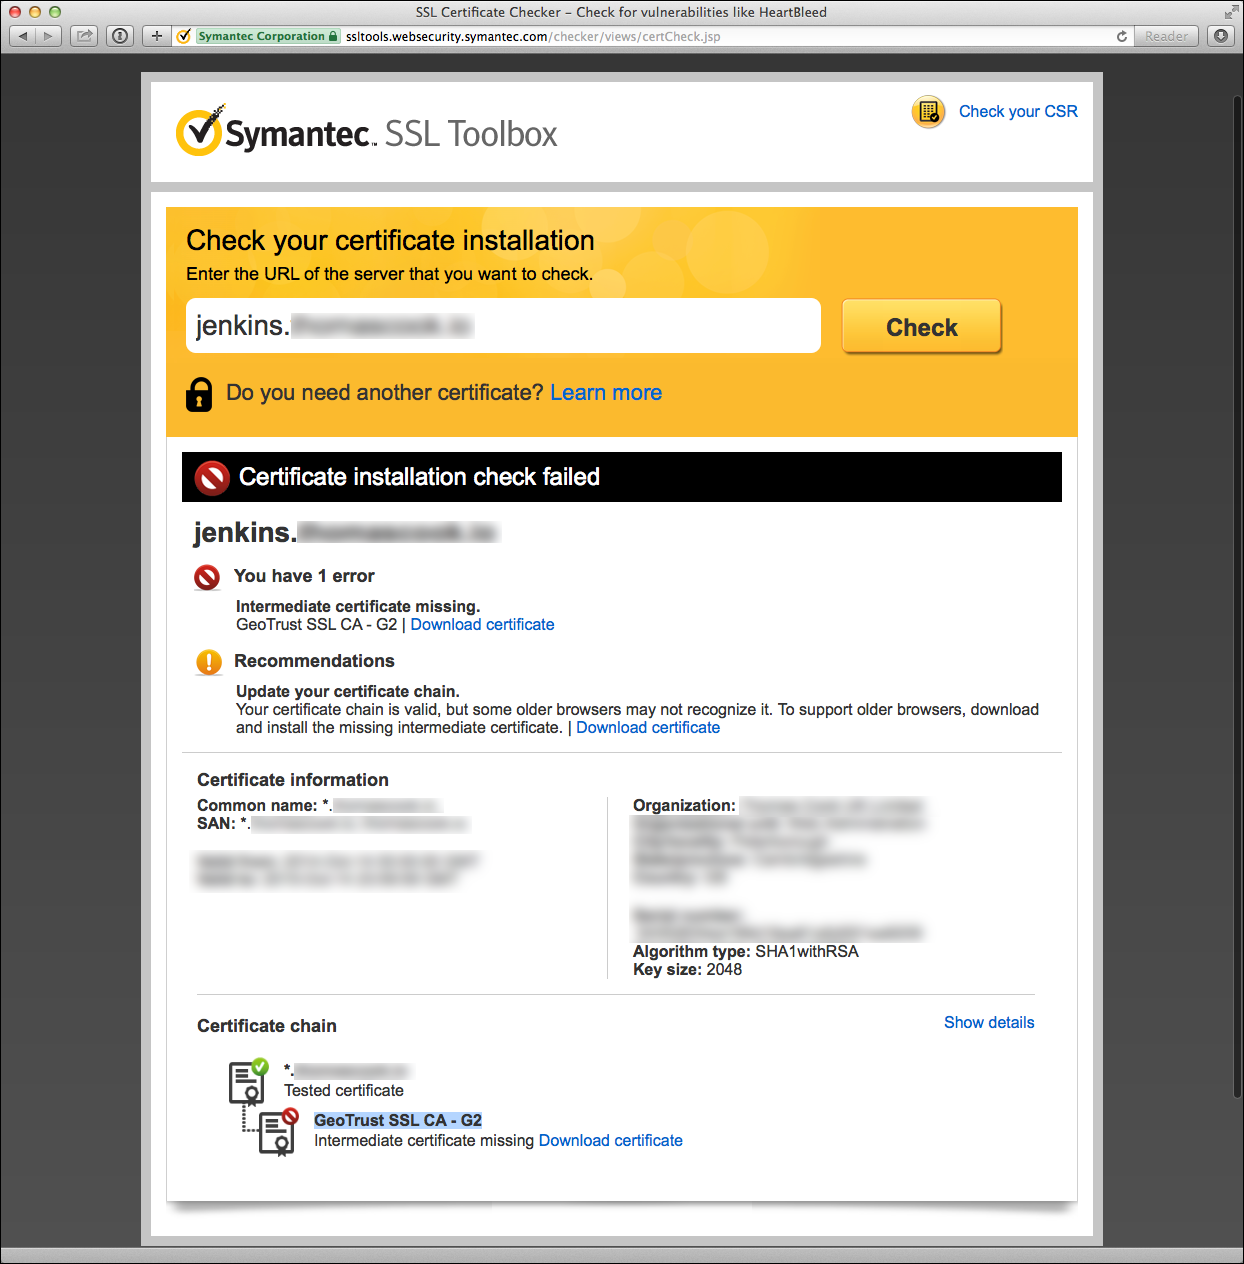
Screenshot of a failed certificate validation in the Symantec SSL Toolbox

Using the Symantec SSL Toolbox against servers with IP ACLs

A great feature of the Symantec SSL Tool is how the tool supports non-public servers behind a firewall. The tool will first attempt to verify your cert from a Symantec server. If your server is behind a firewall that denies public access except for whitelisted origins, the SSL toolbox has a fallback mode to run a Java applet in your browser. The applet will perform the SSL verification requests from local machine rather than a Symantec server.

TIP: GitHub publishes their public IP range for webhooks as part of the GitHub metadata API if you wish to create firewall whitelist rules for GitHub webhook requests.

Symanetc SSL Toolbox Applet and OS X Java security

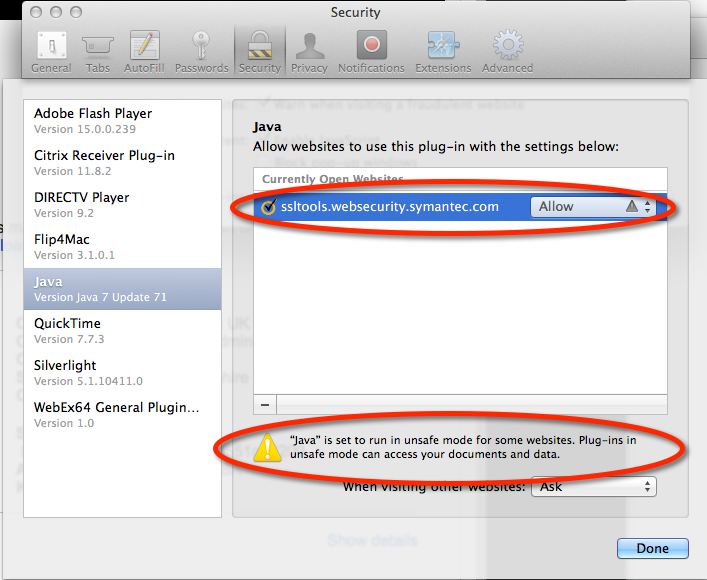
Given the recent security vulnerabilities of Java applets, getting the applet to run on OS X takes some work. Here are the setting I need to use the applet in Safari 7.1 on OS X 10.9.5 (Mavericks) using the Oracle/Sun JRE 1.7 R71. (I never succeeded in using the applet in Firefox or Chrome despite serious effort.)

I needed to enable Safari to run the SSL Toolbox applets in “unsafe mode” without prompting: Screenshot of a Safari security settings for the Symantec SSL Toolbox
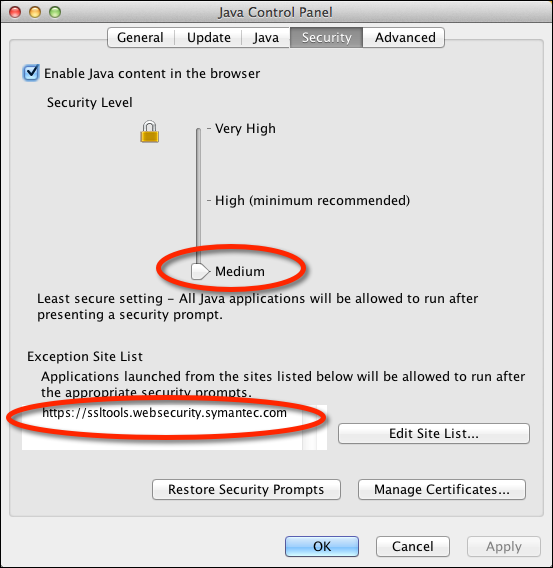
I also had to temporarily downgrade the JVM 1.7 browser security level to “Medium” and add an execption for https://ssltools.websecurity.symanttec.com:
Screenshot of a JVM security settings for the Symantec SSL Toolbox

Green is good!

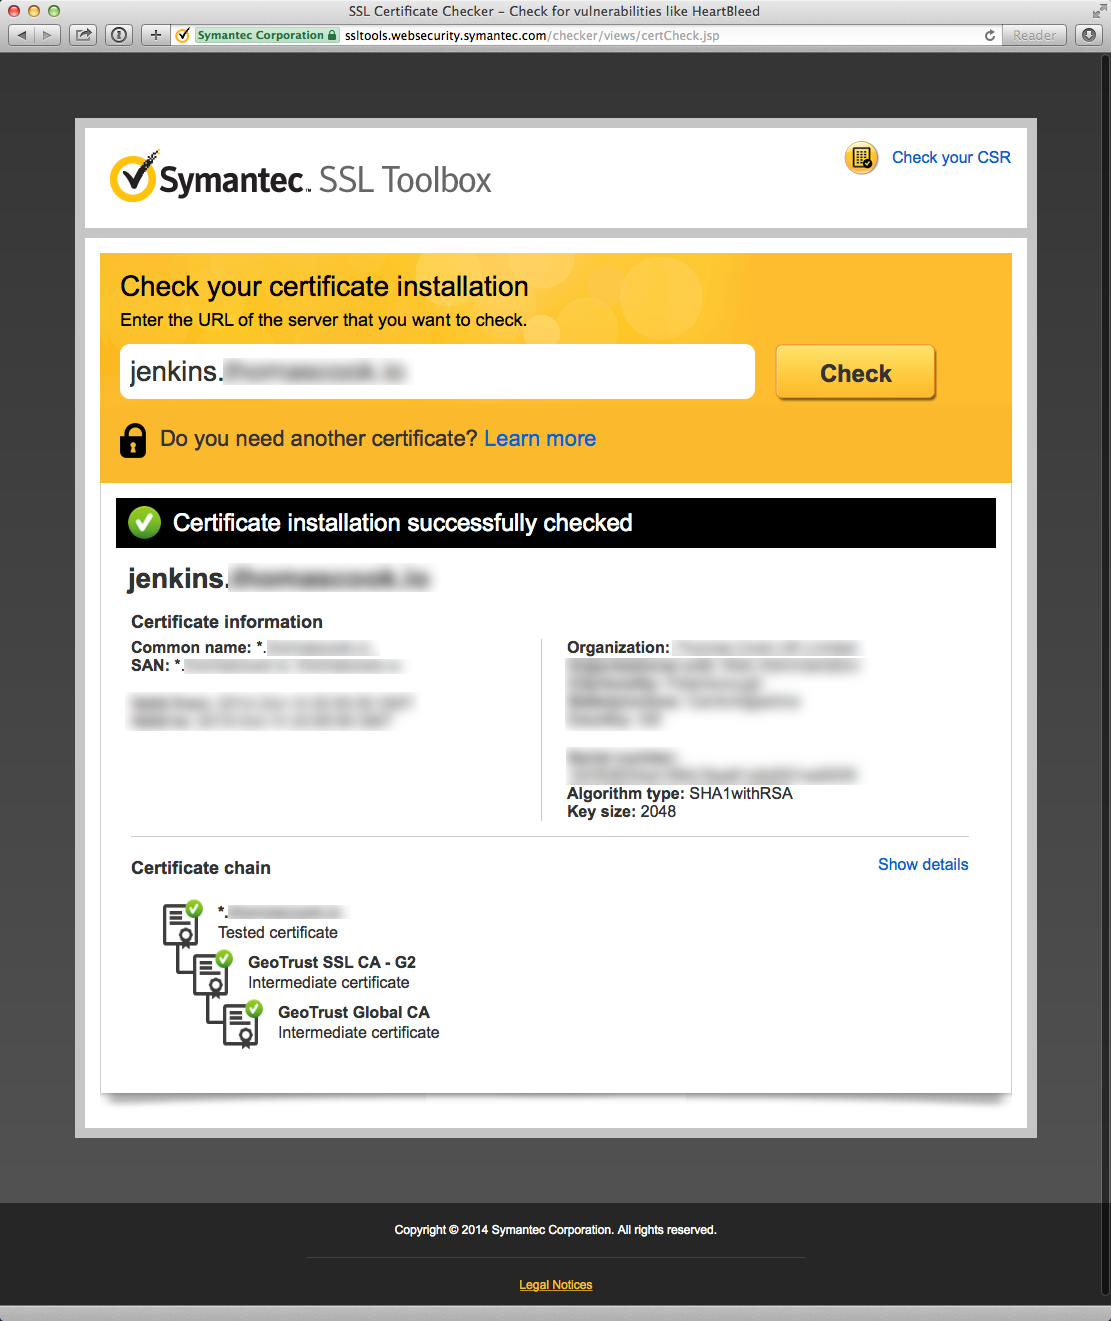
Once you’ve resolved your certificate issues, you should see green in both the Symantec SSL Toolbox and the GitHub WebHook requests after enabling SSL verification.
Screenshot of a succesful certificate validation in the Symantec SSL Toolbox

Screenshot of a succesful certificate validation in a GitHub WebHook configuration screen

Integrating Rackspace Auto Scale Groups With ObjectRocket Mongo Databases

| Comments

Thanks to some pretty awesome support from Jon Fanti and John Moore at ObjectRocket, I learned this week that we had missed two key optimizations for using ObjectRocket MongoDBs with Rackspace Auto Scaling groups (ASGs).

ServiceNet

First, ObjectRocket support can provide medium and large customers with a server FQDN that resolves to a ServiceNet private IP. You can use this FQDN instead of the server name shown in the connect string for your instance. As long as your cloud servers and ObjectRocket are in the same Rackspace data center, the ServiceNet connection string will avoid data transfer charges and keep your packets from transiting the public Internet.

Dynamic IP ACLs

We struggled to manually maintain the list of authorized IPs for our ObjectRocket MongoDB instances when a ASG would add a new node. We had a backlog plan to script the IP ACLs using Chef, but, hadn’t found the time yet.

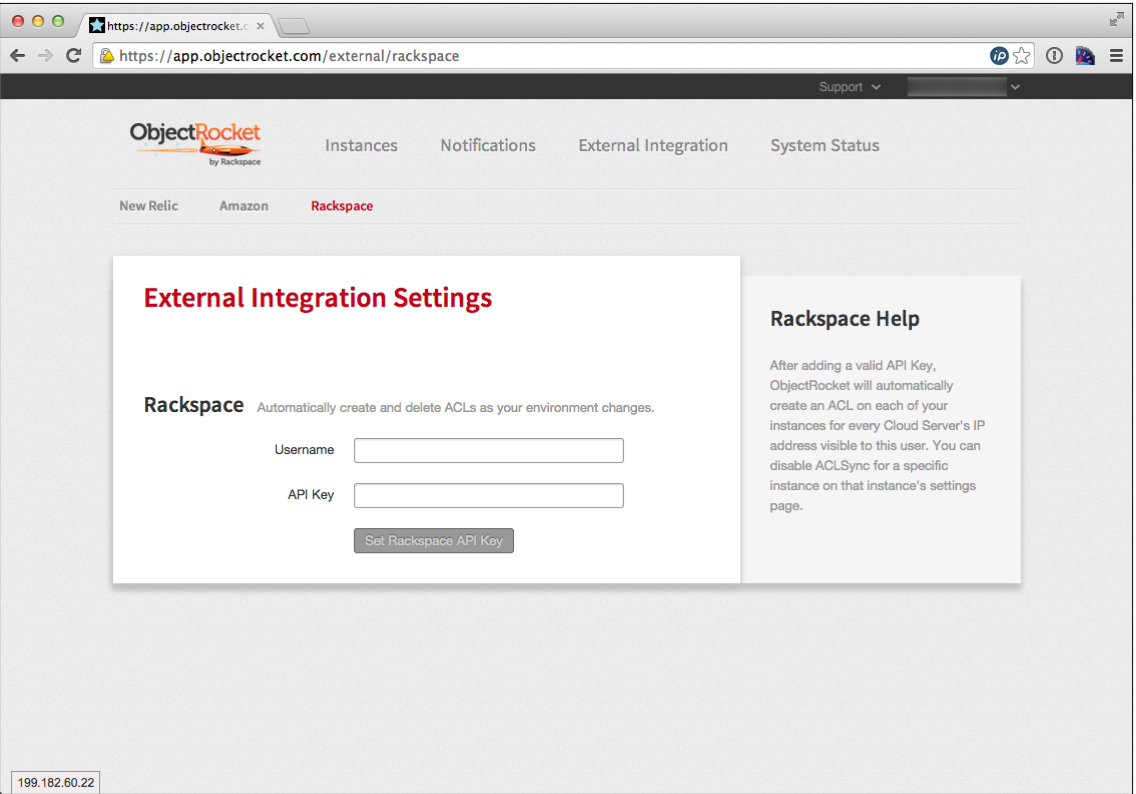
Fortunately, ObjectRocket already supports this! See https://app.objectrocket.com/external/rackspace

Screenshot of ObjectRocket integration with Rackspace

According to John, the ObjectRocket integration with your Rackspace Cloud account will automatically sync the IP ACLs with your list of current Cloud VMs. Moreover, the integration will ignore any manual IP ACLs you create (as long as your description doesn’t use the rax- prefix).

How to Use Jenkins to Monitor Cron Jobs

| Comments

Cron jobs have a funny way of being ignored. Either no one knows the job is failing because the job doesn’t tell anyone. Or, the job is spamming your e-mail inbox many times a day, regardless of success or failure, which means you just ignore the e-mails.

I’ve seen the “Monitor an external job” option for new Jenkins jobs before, and never paid much attention. Turns out it’s a great bucket for storing logs and results of cron jobs.

The external-monitor-job plugin seems to ship with the Jenkins war file. So, your Jenkins should have it out of the box.

Creating a job is pretty simple. It’s just a name and description. Click “New Item” in Jenkins and select the “Monitor an external job” option. This creates a job of type hudson.model.ExternalJob.

The wiki describes a fairly complicated method to download the Jenkins jar files onto the server running your cron jobs, and then use the Java runtime to run a jar with your cron script as an argument. The jar presumably forks your a new shell to run your desired cron command and sends the output/result to Jenkins.

There’s a much easier way to do this. Redirect or tee your job’s stdout/stderr output to a temp file. Then post the result code and log file via curl to Jenkins. No need to download jar files. No need to even have Java runtime on the server.

Just POST a small XML document with the log contents (binary encoded) and the exit code to Jenkins @ /job/:jobName/postBuildResult where :jobName is the URL encoded name of your monitoring job in Jenkins.

[example cron script]
1
2
3
4
5
6
7
8
9
10
11
12
13
14
15
16
17
18
19
20
21
22
23
24
25
26
27
28
29
30
31
32
33
34
35
36
37
38
39
40
#!/bin/sh
# example cron script to post logs to Jenkins

# exit on error
set -e

log=`mktemp -t tmp`
timer=`date +"%s"`
jenkins_job=my_monitoring_job
jenkins_server=http://jenkins.example.com:8080/jenkins/job/$jenkins_job/postBuildResult
# see http://jenkins.example.com:8080/me/configure to get your username and API token
jenkins_username=myusername
jenkins_token=abcdef0123456789fedcba9876543210

function banner() {
  echo $(printf '#%.0s' {1..80}) >> "$log"
}

function report() {
  result=$?
  timer=$((`date +"%s"` - $timer))

  banner
  echo "`whoami`@`hostname -f` `date`: elapsed $timer second(s)" >> "$log"
  echo "exit code $result" >> "$log"

  # binary encode the log file for Jenkins
  msg=`cat "$log" | hexdump -v -e '1/1 "%02x"'`

  # post the log to jenkins
  echo curl -X POST \
       -u "$jenkins_username:$jenkins_token" \
       -d "<run><log encoding=\"hexBinary\">$msg</log><result>$result</result><duration>$timer</duration></run>" \
        $jenkins_server/job/$jenkins_job/postBuildResult
}

trap report EXIT;

banner
echo "hello, world @ `date`!" | tee "$log"
[sample `crontab -e` entry]
1
2
MAILTO=""
0 * * * * /bin/sh /your/directory/myjob.sh

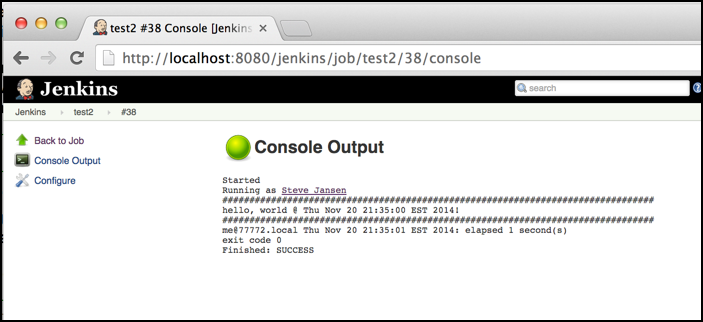
A sample of the build log on Jenkins with a green/red build status:

Sample Jenkins Build Log

Credit to Taytay on Stackoverflow.com for figuring out how to use hexdump to properly encode the XML for Jenkins.

Finding Chef Nodes Bootstrapped in the Last X Hours

| Comments

I needed to write a script to garbage collect old nodes in Chef related to auto-scaling groups.

I decided to search for nodes bootstrapped in the last X hours.

I experimented with ways to find nodes that have been up for less than X hours. In this example, I search for nodes that have been up for 8 hours or less. Of course, this assumes you never restart your nodes:

1
knife exec -E 'search(:node, "uptime_seconds:[0 TO #{ 8 * 60 * 60 }]") { |n| puts n.name }'

I also tried finding nodes that converged in the last 8 hours (which would have to be combined with some other filter of course):

1
knife exec -E 'b = Time.now.to_i; a = (b - (8*60*60)).to_i; search(:node, "ohai_time:[#{a} TO #{b}]") { |n| puts n.name }'

Overall, I think the easiest option is to just set a node attribute like ‘bootstrap_date’ at bootstrap (or set it if it’s nil). This would be a clearcut way to find out how old a node truly is.

One of my colleagues pointed out that Chef Metal sets a very handy node['metal']['location']['allocated_at'] attribute that gets the job done if you are spinning up new nodes with metal.

Regexes for the Serverspec 2 Update

| Comments

The Serverspec team just released v2 of their outstanding testing library today, after a very long beta period. The v2 release had a few breaking breaking changes due to dropped rspec matchers that had been deprecated.

If your test-kitchen tests recently broke today, here’s a few regexes I used with Sublime Text’s regex find/replace to rewrite the dropped matchers for the new matchers.

1
2
3
4
5
6
7
8
9
10
11
it\s*\{\s*(should|should_not)\s*return_(stdout|stderr)\s*\(?(\/.*\/)\)?\s*\}
its(:\2) { \1 match \3 }

it\s*\{\s*(should|should_not)\s*return_(stdout|stderr)\s*\(?(\".*\")\)?\s*\}
its(:\2) { \1 contain \3 }

it\s*\{\s*(should|should_not)\s*return_(stdout|stderr)\s*\(?('.*')\)?\s*\}
its(:\2) { \1 contain \3 }

it\s*\{\s*(should|should_not)\s*return_exit_status\s*(\d+)\s*\}
its(:exit_status) { \1 eq \2 }

Hopefully the kitchen busser project will one day add support for Gemfile-style constraints on the test node, since busser always installs the latest version of a busser plugin gem today..

Chef’ing Custom Nginx Configs With the Nginx Cookbook

| Comments

The nginx cookbook has been super helpful Chef’ing some web apps recently. One thing I struggled to understand was how to use my own custom conf, like /etc/nginx/nginx.conf, that is optimized for how I use nginx.

One solution I tried, which is probably a Chef anti-pattern, is to only include the nginx cookbook on the initial converge:

The Wrong Way

1
2
3
4
5
6
7
8
9
10
11
12
13
14
# the nginx community cookbook will relentlessly revert conf files,
# so avoid running it unless nginx isn't installed,
# or we explicitly reset/delete the node attribute
include_recipe 'nginx' unless node['nginx']['installed']
node.set['nginx']['installed'] = true

# our custom nginx.conf
template '/etc/nginx/nginx.conf' do
   source 'nginx.conf.erb'
   owner 'root'
   group 'root'
   mode  '0644'
   notifies :reload, "service[nginx]", :delayed
end

I knew this was wrong when I wrote it. Chef is all about idempotency. But, I couldn’t figure out a way to keep the nginx cookbook from reverting my custom conf during subsequent converges, only to have my template restore my custom conf a few seconds later.

The Better Way

The OpsCode blog Doing Wrapper Cookbooks Right shows the right way, and really opened my eyes on the power of Chef’s two phase model (compile, then converge).

1
2
3
4
5
6
include_recipe 'nginx'

# use our custom nginx.conf, rather than the one that ships in the nginx cookbook
# this avoids the nginx and my-app cookbooks from fighting for control of
# the same target file
resources('template[nginx.conf]').cookbook 'my-app'

Json-proxy Release 0.2.0

| Comments

Happy to announce a new release of json-proxy, a utility for HTML5 devs to run apps locally and proxy calls like http://localhost:9000/api to a remote server, all without CORS or JSONP.

Grunt Plugin

This release includes better support for running as a grunt plugin. A change in grunt-contrib-connect@0.8.0 simplifies life for proxy plugins inside the livereload task of grunt serve:

1
2
3
4
5
6
7
8
9
10
11
12
13
14
15
16
17
18
19
20
21
22
livereload: {
  options: {
    middleware: function(connect, options, middlewares) {
      // inject json-proxy to the front of the default middlewares array
      // requires grunt-contrib-connect v0.8.0+
      middlewares.unshift(
        require('json-proxy').initialize({
          proxy: {
            forward: {
              '/api/': 'http://api.example.com:8080'
            },
            headers: {
              'X-Forwarded-User': 'John Doe'
            }
          }
        })
      );

      return middlewares;
    }
  }
}

SSL Endpoints

This release adds support for proxying to HTTPS endpoints. Here’s a sample config to forward http://localhost:9000/channel to https://www.youtube.com/channel .

1
2
3
4
5
6
7
{
  "proxy": {
    "forward": {
      "/channel": "https://www.youtube.com:443"
    }
  }
}

HTTP Proxy Gateways and Basic Authentication

You can now pass your authentication credentials to a HTTP proxy gateway on your LAN via the proxy.gateway.auth config setting. The setting value uses the username:password format for HTTP basic authentication (without base64 encoding). Here’s an example config to proxying remote request via http://proxy.example.com:8080 as proxyuser with password C0mp13x_!d0rd$$@P!

1
2
3
4
5
6
7
8
9
10
11
12
13
14
15
var config = {
  "proxy": {
    "gateway": {
      "protocol: "http:",
      "host": "proxy.example.com",
      "port": 8080,
      "auth": "proxyuser:C0mp13x_!d0rd$$@P!" /** 'user:password' **/
    },  
    "forward": {
      "/api": "http://api.example.com",
      "/foo/\\d+/bar": "http://www.example.com",
      "/secure/": "https://secure.example.com"
    }
  }
};

Upgrade to NodeJitsu http-proxy v1.1

This release required heavy refactoring to use the latest bits of Nodejitsu’s http-proxy v1.1

This was necessary since version prior to 1.0 are no longer actively supported.

Housekeeping

There’s better unit test coverage, and the code validates against a reasonable set of jshint linting rules.

Including Another Berksfile in Your Berksfile

| Comments

As part of my cooking with Chef’s new workflow, I wanted Berkshelf to dynamically import the secondary dependencies of my site-cookbook’s dependencies.

Thanks Vasily Mikhayliche’s Coderwall post and Seth Vargo’s post on Berks magic, I was able to hack something that worked for me with Berkshelf v2.0. (We don’t have time to migrate to Berks 3.0 for another couple of weeks, and this feature doesn’t seem to be part of Berks 3.0).

1
2
3
4
5
6
7
8
9
10
11
12
13
14
15
16
17
18
19
20
21
22
23
24
25
26
27
# vi:ft=ruby:
site :opscode

# Extension method to import secondary dependencies in a referenced site-cookbook
# using the constraints in the site-cookbook's Berkshelf file, rather than just
# the name of the dependencies in the site-cookbook's metadata.rb file
#
# credit: https://sethvargo.com/berksfile-magic/
#         https://coderwall.com/p/j72egw
def site_cookbook(path)
  berksfile = "../#{path}/Berksfile"

  if File.exists?(berksfile)
    contents = File.read(berksfile)

    # comment out lines like `site :opscode`, which cannot be imported multiple times
    contents = contents.gsub(/(^\s*site\s)/, '#\1')

    # comment out lines like `metadata`, which cannot be imported multiple times
    contents = contents.gsub(/(^\s*metadata\s)/, '#\1')

    instance_eval(contents)
  end
end

cookbook 'nginx', '~> 2.4.4'
site_cookbook 'my-site-cookbook'

Happy cooking!